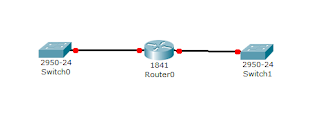
1. First click Router0
2.Click Switch0
3.Connect Router0 with Switch0 using straight cable or can use automatic cable (how to connect with Router0 as FastEthernet0 / 0 while Switch0 as Fastethenet 0/1)
4.Click Switch1
5.Connect Router0 with Switch1 using straight cable or can use automatic cable (how to connect with Router0 as FastEthernet0 / 1 while Switch1 as Fastethenet 0/1)
later will be like the picture below:
then setting Router0 first First we will do the settings on Router0 and settings like this:
1.klik Router 0
2.Click config
3.Click fastethernet 0/0 (we click on fastethernet0 / 0 because this is used for connection Switch0 with Router0)
4. Check the Status Port to ON
5.Isi IP Address with 192.168.1.1 and click to subnet mask column then automatically will come out number 255.255.255.0
if true then the settings are like this picture
and there will be a green image like in the picture above, then setting up Router0 again, for setting fastehtenet0 / 1 which connects to Switch1 and the way as below
1.klik Router 0
2.Click config
3.Click fastethernet 0/1 (we click fastethernet0 / 1 because this is used for connection Switch1 with Router0)
4. Check the Status Port to ON
5.Isi IP Address with 168.168.1.1 and click to subnet mask column then automatically will come out number 255.255.0.0
if true then the settings are like this picture
if you have set up Router0, then just add 2 pc on the left side of switch0, and add 2 pc on the right side switch1, as shown below:
in the picture above PC0 and PC1 are on the left Switch0, while PC2 and PC3 are on the right side of Switch1, after we make the picture above, we just fill the IP Address and also Default Gateway from each PC.
First we will Set Up IP Address and Default Gateway from the left side of Swicth0 ie PC0 and PC1
For PC0:Next we will Set the IP Address and Default Gateway from the right side of the Swicth1 PC2 and PC3
IP Address: 192.168.1.2 (According to the Fastethernet IP Address 0/0 ie 192.168.1.1 but changed its last number to 2)
Subnet Mask: 255.255.255.0
Default Gateway: 192.168.1.1 (As per IP address fastethernet 0/0 ie 192.168.1.1)
For PC1:
IP Address: 192.168.1.3 (As per IP address fastethernet 0/0 ie 192.168.1.1 but changed its last number to 3)
Subnet Mask: 255.255.255.0
Default Gateway: 192.168.1.1 (As per IP address fastethernet 0/0 ie 192.168.1.1)
For PC2:After you have finished all of them, you just ping pc, first will fail first but after that will succes on second ping
IP Address: 168.168.1.2 (As per the IP Address fastethernet 0/1 is 168.168.1.1 but changed its last number to 2)
Subnet Mask: 255.255.255.0
Default Gateway: 168.168.1.1 (As per IP Address fastethernet 0/1 is 168.168.1.1)
For PC3:
IP Address: 168.168.1.3 (As per IP address fastethernet 0/1 is 192.168.1.1 but changed its last number to 3)
Subnet Mask: 255.255.255.0
Default Gateway: 168.168.1.1 (As per IP Address fastethernet 0/1 is 168.168.1.1)
Explanation:download the file can be below:
First Connection between Switch and Router must be correct, ie fast ethernet0 / 0 connection for left switch0 and fast ethernet 0/1 for right switch1. Both IP addresses in routers that are in fastethernet 0/0 with fastethernet 0/1 must be different ie 192.168.1.1 with 168.168.1.1, all three IP addresses in fast ethernet 0/0 are used to defaul gateway on pc left part and also for IP address pc but the last number should be different eg default gateway 192.168.1.1 then the IP address for pc 192.168.1.2, while the IP address in fastethernet 0/1 is used for the default gateway on the right pc, and IP address on the PC, the last digit is also replaced, default gateway 168.168.1.1 then the IP address for pc 168.168.1.2, Fourth when the first ping will fail but when the second ping will success.
Download
That's how to connect 1 router, 2 switches and 4 pc in Cisco packet tracer, thanks for reading.


EmoticonEmoticon